Monday, February 1, 2016

Kafka Fun

In this post, I will show you how to set up Kafka locally via three brokers and how to get Producer and Consumer going.

Installation


First of all, download Kafka from http://kafka.apache.org/downloads.html.
(Make sure to download binary version, not the source!)

I chose to go with version 8 only because I rather avoid x.0 version of Kafka 9.0. Nothing in my experience works well when it is x.0 version. I only work with x.1 and above :) (j.k. of course)

Download it into directory of your choice and untar it

tar xzf kafka_2.11-0.8.2.1.tgz

Create log directories for three brokers


Now since we will be creating three brokers on the same machine, we need to create three separate log directories in order to avoid these three to be overwriting each other logs.

Als-MacBook-Pro:kafka alkrinker$ mkdir broker-1-log
Als-MacBook-Pro:kafka alkrinker$ mkdir broker-2-log
Als-MacBook-Pro:kafka alkrinker$ mkdir broker-3-log

Start zookeeper


Kafka requires zookeeper. Conveniently enough, Kafka comes with its own version of zookeeper. This version of the zookeeper is not meant for production, more for test and demo. Let's start it.

cd kafka_2.11-0.8.2.1/
bin/zookeeper-server-start.sh config/zookeeper.properties &

Check if zookeeper is running

ps -ef | grep zookeeper

You should see something like that

Als-MacBook-Pro:kafka_2.11-0.8.2.1 alkrinker$ ps -ef | grep zookeeper
  501   849   596   0  5:49PM ttys000    0:00.55 /Library/Java/JavaVirtualMachines/jdk1.8.0_25.jdk/Contents/Home/bin/java -Xmx512M -Xms512M -server -XX:+UseParNewGC /kafka
......
/kafka_2.11-0.8.2.1/bin/../core/build/libs/kafka_2.10*.jar org.apache.zookeeper.server.quorum.QuorumPeerMain config/zookeeper.properties


Up to this point, we started built in zookeeper with default property file and created three log directories for each broker

Configure brokers


Each broker would require its own configuration file in order to run. Once again, Kafka comes with default configuration file located in

config/server.properties

Let's copy this file three times for each broker so we can have something like

config/server1.properties
config/server2.properties
config/server3.properties

Open server1.properties and change following properties to provided values
--- server 1 ---
broker.id=1
port=9091
log.dirs=/Users/alkrinker/Documents/Projects/kafka/broker-1-log

--- server 2 ---
broker.id=2
port=9092
log.dirs=/Users/alkrinker/Documents/Projects/kafka/broker-2-log

--- server 3 ---
broker.id=3
port=9093
log.dirs=/Users/alkrinker/Documents/Projects/kafka/broker-3-log

Start brokers


Time to start your brokers!
$ bin/kafka-server-start.sh config/server1.properties &
$ bin/kafka-server-start.sh config/server2.properties &
$ bin/kafka-server-start.sh config/server3.properties &


Use grep kafka to make sure you have 3 brokers started (plus zookeeper)
Output should look something like that
Als-MacBook-Pro:Installation Files alkrinker$ ps -ef | grep kafka
  501   849   596   0  5:49PM ttys000    0:04.40 /Library/Java/JavaVirtualMachines/jdk1.8.0_25.jdk/Contents/Home/bin/java -Xmx512M -Xms512M -server -XX:+UseParNewGC 

...........
org.apache.zookeeper.server.quorum.QuorumPeerMain config/zookeeper.properties


 501   969   596   0  8:44PM ttys000    0:02.20 /Library/Java/JavaVirtualMachines/jdk1.8.0_25.jdk/Contents/Home/bin/java -Xmx1G -Xms1G -server -XX:+UseParNewGC 
.......
/kafka/kafka_2.11-0.8.2.1/bin/../libs/zkclient-0.3.jar:/Users/alkrinker/Documents/Projects/kafka/kafka_2.11-0.8.2.1/bin/../libs/zookeeper-3.4.6.jar:/Users/alkrinker/Documents/Projects/kafka/kafka_2.11-0.8.2.1/bin/../core/build/libs/kafka_2.10*.jar kafka.Kafka config/server1.properties
  

501   975   596   0  8:44PM ttys000    0:01.68 /Library/Java/JavaVirtualMachines/jdk1.8.0_25.jdk/Contents/Home/bin/java -Xmx1G -Xms1G -server -XX:+UseParNewGC 
.......
/kafka/kafka_2.11-0.8.2.1/bin/../libs/zkclient-0.3.jar:/Users/alkrinker/Documents/Projects/kafka/kafka_2.11-0.8.2.1/bin/../libs/zookeeper-3.4.6.jar:/Users/alkrinker/Documents/Projects/kafka/kafka_2.11-0.8.2.1/bin/../core/build/libs/kafka_2.10*.jar kafka.Kafka config/server2.properties

  501   978   596   0  8:44PM ttys000    0:01.61 /Library/Java/JavaVirtualMachines/jdk1.8.0_25.jdk/Contents/Home/bin/java -Xmx1G -Xms1G -server -XX:+UseParNewGC 

......

/kafka/kafka_2.11-0.8.2.1/bin/../libs/snappy-java-1.1.1.6.jar:/Users/alkrinker/Documents/Projects/kafka/kafka_2.11-0.8.2.1/bin/../libs/zkclient-0.3.jar:/Users/alkrinker/Documents/Projects/kafka/kafka_2.11-0.8.2.1/bin/../libs/zookeeper-3.4.6.jar:/Users/alkrinker/Documents/Projects/kafka/kafka_2.11-0.8.2.1/bin/../core/build/libs/kafka_2.10*.jar kafka.Kafka config/server3.properties


 501   984   826   0  8:45PM ttys002    0:00.00 grep kafka


Create topic


(See man page for kafka-topics.sh for more details and all available options)

$ bin/kafka-topics.sh --zookeeper localhost:2181 --create --topic krinker --partitions 3 --replication-factor 3

Let's go over this line
--zookeeper localhost:2181
first we specify where is our zookeeper. We are using the default zookeeper here
--create --topic krinker
creates topic called krinker
--partitions 3 --replication-factor 3
since we have 3 brokers we can safely do 3 partitions with replication factor of 3. Note that we cant specify more than 3 here since we have only 3 brokers

After it let's what what we created


$ bin/kafka-topics.sh --zookeeper localhost:2181 --describe --topic krinker

Topic:krinker    PartitionCount:3    ReplicationFactor:3    Configs:
    Topic: krinker    Partition: 0    Leader: 1    Replicas: 1,2,3    Isr: 1,2,3
    Topic: krinker    Partition: 1    Leader: 2    Replicas: 2,3,1    Isr: 2,3,1
    Topic: krinker    Partition: 2    Leader: 3    Replicas: 3,1,2    Isr: 3,1,2


Start Producer


Let's start producer on broker 1
$ bin/kafka-console-producer.sh --broker-list localhost:9091 --topic krinker

Start Consumer


And let's start consumer to be able to read what our producer would write to topic krinker

$ bin/kafka-console-consumer.sh --zookeeper localhost:2181 --topic krinker

See it in Action!


Now go back to the terminal where you started your producer and type whatever you like

Hello World


Now go to the consumer window and you shall see Hello World displayed there.


Shut it down


$ bin/kafka-server-stop.sh config/server1.properties
$ bin/kafka-server-stop.sh config/server2.properties
$ bin/kafka-server-stop.sh config/server3.properties
$ bin/zookeeper-server-stop.sh config/zookeeper.properties

Verify
$ ps aux | grep kafka
alkrinker        1115   0.0  0.0  2432784    628 s000  S+    9:30PM   0:00.00 grep kafka

Sunday, January 31, 2016

Coursera Offline

A lot of good classes on coursera for free these days! Love that site.

Now, it is all good, but what if you are traveling and don't have reliable internet connection or no connection at all and you still want to watch the videos?

Of course, you can download videos by hand, but it is a pain.

I found this useful github project that can help you
https://github.com/coursera-dl/coursera

You need python 3 and pip 3 (I tried to do it with python 2 and it choked. plus the author of plugin strongly encourages to use python 3 due to encryption, etc)

Steps to get these files on Ubuntu OS
0. Update!
apt-get update

1. Install python 3 - if you are using Ubuntu 14.04, you already have it.

2. Install pip 3
apt-get install python3-pip

3. Per instructions (here) install coursera plugin
pip3 install coursera

4. Per instructions (here) supply your username and password as well as the course that you want to download
coursera-dl -u <user_name> -p <password> <course_name>

5. After some time you will see folder <course_name> with all videos and lecture notes broken down per section.

Enjoy studying off line!


Tuesday, January 19, 2016

Will it snow?

Being that it is January and that I have Macklemore concert in Richmond to go to this Friday, I am naturally curious if it will snow this Friday making my ~1.5h drive to Richmond potentially 3h+ drive... Yes, I looked up the weather predictions at Weather Underground(WU), the best weather forecast site in my opinion, but how do I know if it is accurate... or can I do better?

In order to predict weather for this Friday, I will employ simple Machine Learning technique!

It is very simple...
First you would need to collect the data. For this purpose I will return to WU site to collect year worth of data. Like I said, the site is awesome. Not only they are pretty accurate in their predictions, at least for my area, but they also have some cool gadgets and they share their data for free!

Now... The data won't be clean and what we will get from WU won't be immediately usable. From what I mentioned in one of my previous posts: one of the skills with working with data is to be able to clean it. There are numerous examples out there where dirty aka noisy data led to errors, either unintentional or not. So, second step would involve cleaning of the data.

Now that we have data, we will be able to use decision tree classifier to come up with the model. When we are satisfied with the model, we will be able to use it to come up with our own prediction for this weekend and compare the results with WU and then wait and see who was right :)

The Plan

Step 1

Data that will be given to us by WU will consist of several different features and the outcome for that day. For example, we will have the information of what happened that day. Did it snow? Was it nice and sunny? Or was it raining cats and dogs? I.e. we will have the outcome! As far as features go: we will have information about temperature, humidity, wind, etc. All of these together would help us to predict the weather: if it is 80 degrees and visibility is sunny - it is unlikely that it would snow, but most likely that it will be a nice weather to enjoy the outside on a beach! Hence our goal here is to gather features or attributes of the day that would help us determine the outcome of that day: snow, rain, etc.

Step 2

Clean it!

Step 3

Use Decision Tree to come up with model. For example, let's says that we have temperature of more than 80 degrees and we see historically that it never rained or snow when it was above 80 degrees, then one branch of the decision tree would be condition: if temp > 80 then "No Snow", what happens if it is less than 80? Well, we can look at other attributes that we will gather, let's say that if it was less than 80 degrees but more than 30 and outlook was sunny, it never snowed. Here you have yet another condition! If 30 < temp < 80 ad outlook is sunny then "No Snow". Hopefully, you can see the idea and where we are going with this at this point!
For step 3 to make things easier, I am going to use Weka. It is a machine learning software written in Java.

The Action

Now let's get some data!

Go to http://www.wunderground.com/
On the menu locate 'More' and select 'Historical Weather' submenu.
Enter zip code. In my case, I entered 23220 since I am trying to predict weather in Richmond this Friday! And hit 'Enter'
Locate Custom tab (Daily, Weekly, Monthly, Custom) and select year worth of data.


Select Get History. Then go all the way to the bottom to be able to download comma delimited file


I downloaded my file as richmond_data.csv and saved it on my laptop...

Ever since I migrated to MacOS, I started to favor Google Docs. For one thing, I don't want to learn Mac Office and then have to deal with converting my docs and excel spreadsheets for PC users... Finally, with Google Docs my documents are already in the cloud, hence less stuff to back up and worry about it.
Go to https://drive.google.com/ and create a new google sheets document.
File->Import and import your file (richmond_data.csv).
For import action, pick 'Import New Sheet(s)', for separator character, go ahead and pick comma. Hit Import and you shall see something like:


Now it is time to clean!!!


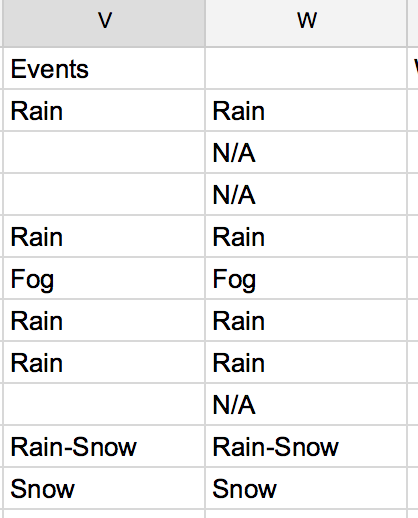
So we have a bunch of attributes and accompanied event for that day. Take a look at the last column: 'Event'. It contains what actually happened that day and as you can see some of the values are empty. Let's correct that and put 'N/A'. Instead of filling it out by hand, let's employ some of the excel wizardly. Create a new column right after 'Event' column and insert following formula (In my case, my 'Event' column is in V column):

=if(V2="","N/A",V2)

Basically, it does simple check to see if value is empty, if so, insert "N/A", if not put the original value in. Now drag it to the bottom and you shall have no empty values left at this point.


Now, we see that we can further improve the 'Event' column. As you can see we are given, multiple events in one column and ('Rain-Snow') and others are little value to us ('Fog' - I don't care if it will be foggy, I have anti fog lights on!!! :) ). So let's modify our formula to give us Snow or N/A.

=if(isnumber(find("Snow", V2)),"Snow","N/A")


Now let's swap 'Events' column with our clean column. You copy W column and paste is as values only and delete V column. Simple!

More cleaning: Precipitation column contains numeric value and T. Let's change it to 0 not to throw our model into a panic mode. Follow the same steps as above but with a slightly different formula, and after you are come copy/paste the values and delete old column.

=if(T2="T",0,V2)

Now, we will be predicting the weather! so we should not put the answer on the same line as list of attributes, i.e. we can not post the weather for that day along with the same day events. We will be predicting it, so we need to put tomorrow's weather in the same row as today's attributes. Select V3 cell and copy all the way to the bottom thus selecting all values for the weather. Now go to V2 and paste it over. So here, you have list of attributes and weather event that happened the next day. 

(Just glancing over the data it snowed like 6 times entire year! felt more than that probably since snow was never cleaned even that it only snowed so few times... VDOT... what can I say...)

At this point we have a relatively clean data, so let's download it locally so we can feed it to Weka and do some magic with it. File-> Download As->Comma separated values. (Can't go wrong with this format)

Let's model it!!!


Start Weka and pick 'Explorer' option.
Select 'Open file...' . Pick CSV as your type and navigate to the location of your downloaded file.


If you look at the EST column, you will see that it has 366 unique values. Makes sense since we see each day of the year here. This will not be useful to us so let's remove this column. (Select the checkbox next to it and click Remove button).

Select 'Classify' tab.
Select 'Choose' and pick J48 under trees submenu
Under 'More Options' select Events since that's what we are going to try to predict.
Hit Start


After few seconds, you shall have your decision tree!!!

Now all that hard work of trying to come up with attributes/features that would help you determine what will happen tomorrow was already done for you! Here you can create either your own weather app or just look at the temp and say that if it was less than 32 degrees and cloudcover was more than zero it would snow.
As you can tell, the tree is not very big... but we were expecting it since it only snowed some few times in the last year.

Scroll in the window to see more interesting stuff like confusion matrix and so on. If you take stats, you can use Weka to double check your results :)


As far as Richmond trip goes, if temperature will be less than 32 (it will be...) and we will have clouds the night before, it will snow. We shall see!!!

Sunday, December 20, 2015

Accessing wired Windows printer from your Mac

Before my PC seized to be, I used to have old wired printer that did the job... the only problem was that I already have few Apple laptops and I wanted to be able to print from them (The problem is easily solved by buying wireless printer that supports AirPrint, i.e. even print from your iPhone!).

Anyway, if you have wired Windows printer and don't want to upgrade just yet here is what you need to do:

On Windows PC
1. Establish user account on your PC. This was one thing that I had to do to make everything that should work to actually work. This is as easy as opening your control panel and clicking on Add user in your Users menu. For more tricks see this: http://www.howtogeek.com/howto/10325/manage-user-accounts-in-windows-home-server/

2. Now onto actual set up... Select Start->Devices and Printers. Right click on the printer that you want to share, and either pick share or properties and then pick sharing tab. Make sure that share check box is selected and make sure that you note down the name of the printer.

3. Open command prompt. Use ipconfig command to find your PC's IP.

To summarize this part. You have IP address and name of the printer to connect to and you have the credentials that you created in step 1.

On MAC
1. Open System Preferences and locate Printers and Scanners icon. Click!
2. Select + under printers to add new printer, i.e. wired Windows printer.
3. Right click on the menu and select Customize Toolbar and add Advanced
4. Click on Advanced. For type select Windows printer via spoolss
5. For URL provide IP and printer name that you have... so the link looks like smb://192.138.1.13/printer_name (Replace any spaces with %20 in your
6. Under Choose a driver or Printer Model pick your printer type (I did not see my exact model so I picked closes HP model instead. Worked)
7. At this point your PC printer will be connected to your Mac.

Testing
Select something to print on your Mac... in my case, the first time it tried to print it asked for my PC username/password which we created previously, after that it was stored in my keychain and was never an issue again.

That's it! Hope it helps and once again, let me know if you have further questions, etc.

Sunday, August 2, 2015

ElasticSearch... is awesome. You just have to know what you are doing ;)

I was using Solr for many years... well relatively. I started when Solr 4.0 just came out and had hands on production level experience all the way to Solr 4.8.

Recently, I was put in charge of the project that had to use ElasticSearch as its search engine. I was happy to jump on this opportunity and get my hands on it. I previously looked at ElasticSearch, but at that point it was very immature and I decided to pass on it at that time since I felt it was not ready to support my applications. Though I did have my eye on it, and I saw how it was using Solr's shortcomings to come up with a better architecture and address all "i wish Solr would do <insert here>".

So when I was asked to architect a robust ElasticSearch API to provide easy to use, scalable solution for series of projects I was excited.

From working with ElasticSearch, I was intrigued by how configurable it can be... i.e. I was able to specify type of the field, how it shall be analyzed and broken down and used during various series of its processing.

A very good and detailed article can be found here: https://www.found.no/foundation/text-analysis-part-1/
Spend some time with this one.

and don't be afraid to experiment. Analyze API is there for you to fine tune your schema to exactly what you want: https://www.elastic.co/guide/en/elasticsearch/reference/current/indices-analyze.html

I also found this to be very simple and yet comprehensive tutorial on analyzers: https://www.elastic.co/guide/en/elasticsearch/guide/current/analysis-intro.html#_built_in_analyzers

One of the challenges that rose late in the development cycle is ability to provide accurate searches when dealing with special characters. That was great opportunity for me to fine tune settings. I greatly enjoyed reading following article: http://www.fullscale.co/blog/2013/03/04/preserving_specific_characters_during_tokenizing_in_elasticsearch.html

Based on what I saw on stackoverflow.com and other sites, one of the issues that new users of ElasticSearch face is using _all field during searches. When searching, if you use '_all' field it by default combines all fields in your documents into a single field which is analyzed by the default analyzer. You need to search individual fields (not _all) for the field specific analyzer to be applied. In other words, if you have fine tuned schema with proper analyzers, etc none of it will be applied when you are not explicitly searching against a field that has it... So be careful there.

Also going back to special characters searches. I was faced with a question of what kind of tokenizers are the best for search for words with hyphens in them? As a start I chose to use word-delimiter filter and I specified to preserve the original. Complete settings list can be found here: http://www.elasticsearch.org/guide/reference/index-modules/analysis/word-delimiter-tokenfilter.html
I end up using generate_word_parts = true, generate_number_parts = true, catenate_all = true, preserve_original = true, split_on_numerics = false.

In my case it was the best fit based on my requirements... Your settings might end up being different.

Hope it helps and like always. Don't be afraid to reach out and ask for help! 

Sunday, July 5, 2015

Machine Learning... Taking first steps

This is going to be my first post (of many, I hope!!!) where I would discuss my recent projects dealing with machine learning (ML) and what I learned from them. I hope to benefit people who are trying to understand topics of ML and to make notes for my own future reference.

First of all, why do we need ML in the first place? Well, ML we can be broken into two categories "Supervised Learning" (SL) and "Unsupervised Learning" (UL).

SL in my opinion is more widely used and presents more practical applications versus UL. Let's consider few examples, SL can be further broken down to "Classifiers" and "Regression". As the name may suggest, classifiers try to predict type or class of the outcome based on historical data. For example, given number of emails some of which were classified as spam and some of which were flagged to be not spam, we can build a classifier that will try to automatically filter incoming mail as spam or not spam for us. You can see this in your Outlook or Gmail! (Ummm, I feel that I need to cover spam filtering in bit more details in the future. Stay tuned.)

Classifiers try to predict more or less yes/no answer. Is it a spam or not? Is it a car or not? Is it fraudulent transaction or not? Regression on other hand tries to predict certain value based on known parameters. One example is house cost prediction: given parameters of the house such as sq ft, number of bedrooms and bathrooms, etc, time of year and its location, one can try to predict its cost at a certain time in the future.

UL - since outputs are unknown you can not really train your algorithms to predict since you don't know what it is. One of the classical uses of UL is "Clustering". For example, taking few specific properties of a subject plot them on a "map" to see if clusters would be formed, which would help you to determine relationship between your input data. For example, if you have hundreds of articles and what to know which ones are related to each other, you can read all of them and to make your decision OR you can use ML! In the nutshell, you would feed your articles where they would be broken down to individual words and indexed (see Lucene for more information). Then cosine similarity (more on in one of my future posts!!!) will be used to determine how "close" one document relates to each other. Based on that clusters would be formed where related articles will be grouped together and unrelated will be separated... This way you could easily tell if two articles are related or totally different.

Other examples of ML include:
- Targeted retention - It would cost companies a lot of money to try to offer all of their customers incentive to stay. Instead companies try to determine which of their customers are most likely to leave and offer them a great deal in order to retain them.
- Recommendation Engines - Ever bought anything on Amazon? Then I am sure you saw a list of suggested recommendations :)
- Sentiment Analysis - Is it good or bad? A quick example, using Natural Language Processing (NLP) we can extract and process text to determine if it contains a lot of "positive" words such as 'good', 'awesome', etc

and that's us just scratching a surface of endless possibilities of ML!

Saturday, July 4, 2015

ElasticSeach JAVA API to find aliases given index

Recently I posted on stackoverflow on how to find aliases for the given index using JAVA API, so I thought I would like to it from here as well.

http://stackoverflow.com/questions/31170105/elasticseach-java-api-to-find-aliases-given-index

How to find aliases for given index in ElasticSearch using Java?
By using REST API it is pretty easy
https://www.elastic.co/guide/en/elasticsearch/reference/1.x/indices-aliases.html#alias-retrieving

While working with ElasticSearch, I ran into an issue where I needed to get a list of aliases based on provided index.

While getting a list of aliases is pretty straightforward:
 client.admin().cluster()
    .prepareState().execute()
    .actionGet().getState()
    .getMetaData().aliases();

While working with ElasticSearch, I ran into an issue where I needed to get a list of aliases based on provided index.
While getting a list of aliases is pretty straightforward:
 client.admin().cluster()
    .prepareState().execute()
    .actionGet().getState()
    .getMetaData().aliases();
I struggled to find an easy way to be able to get aliases for given index without having to iterate through everything first.
My first implementation looked something like this:
    ImmutableOpenMap<String, ImmutableOpenMap<String, AliasMetaData>> aliases = client.admin().cluster()
        .prepareState().execute()
        .actionGet().getState()
        .getMetaData().aliases();

    for (ObjectCursor<String> key: aliases.keys()) {
        ImmutableOpenMap<String, AliasMetaData> indexToAliasesMap = client.admin().cluster()
          .state(Requests.clusterStateRequest())
          .actionGet().getState()
          .getMetaData().aliases().get(key.value);

        if(indexToAliasesMap != null && !indexToAliasesMap.isEmpty()){
            String index= indexToAliasesMap.keys().iterator().next().value;
            String alias = indexToAliasesMap.values().iterator().next().value.alias();
        }
    }
I did not like it... and after poking around, I was able to get an idea on how to do it more efficiently by looking at RestGetIndicesAliasesAction (package org.elasticsearch.rest.action.admin.indices.alias.get)
This is what I end up with:
    ClusterStateRequest clusterStateRequest = Requests.clusterStateRequest()
            .routingTable(false)
            .nodes(false)
            .indices("your_index_name_goes_here");

    ObjectLookupContainer<String> setAliases= client
            .admin().cluster().state(clusterStateRequest)
            .actionGet().getState().getMetaData()
            .aliases().keys();
You will be able to find aliases for the index that you specified in setAliases
Hope it helps someone!